
My Graphite Drawing Supplies
Drawing Supplies
Pencils

Staedtler Mars-780 Clutch Pencil
I use a Staedtler Mars-780 mechanical lead holders for all my graphite work. I find them nicely balanced, very affordable, and the best feature, they have color-coded caps that are included with the boxes of 12-leads that allow you to differentiate between the various lead harnesses at a glance. I find this an easier method than reading a label. I truly believe that differentiating between grades by color is a right-brained process and allows you to stay "in the zone" while you're drawing. I've even managed to find electrical tape in a range of colors that I use to color-code my other mechanical pencils.
I use a wide range of pencil grades including 6H, 4H, 2H, H, F, HB, B, 2B, and 4B, however, I mainly use 2H, HB, and 2B for the majority of my drawing. I also use a 6B Tombow pencil for filling in large areas of extremely dark tone on the paper. Tombow makes an excellent wood-cased pencil and is my favorite brand just edging out Staedtler's wood-cased line.
Paper
I am a self-professed paper-junkie and I love trying new types of paper. I have a couple of brands that I have really grown to love and I am always willing to try something new. The most important point to make is, make sure you have a high-quality, fairly smooth, rugged paper for graphite; it needs to take a beating during your hours at the drawing table.
I have organized my mini-reviews in terms of paper tooth with the smoother papers at the top.
Strathmore 400 Series Bristol Smooth

Strathmore 400 Series Bristol Smooth Paper
Highly Recommended
Moderately Archival
An excellent all around paper for pencil work. Very smooth, but not "too" smooth. I use this for numerous commissions because of how forgiving it is. It has a pleasant off-white tone which is nice for framed originals. I find myself wishing 400 Series was a bit softer to allow for darker tones but it's a good choice for medium- to light-toned drawings. It is an acid-free cellulose paper giving it a Good archival rating. I would highly recommend this paper to anyone.
Arches Hot Press Watercolor Paper (also includes Bright White)

Arches Hot Press Watercolor Paper 140lb
Recommended
Very Archival
A fairly smooth hot press watercolor paper. It has plenty of tooth to hold lots of media (graphite or charcoal). I've tried very diligently to use watercolor papers for drawing but I just can't seem to convince myself that it fits my style of drawing. Many of my artist friends use it to great effect but I just don't seem to be able to get over my dislike of the extra tooth.
I used to use the standard white, but I tried some Bright White and have switched to it for drawings I intend to sell as prints. The brighter white allows me to scan the drawing and still retain the brighter values without getting clipped highlights. I haven't noticed much difference between the texture of the two papers, but I would say that the Bright White has a slightly denser feel than the traditional white. This 100% cotton rag paper is acid free and very archival.
Fabriano Artistico Hot Press

Fabriano Artistic Hot Press Watercolor Paper 140 lb
Recommended
Very Archival
Fabriano Hot Press Watercolor Paper A favorite paper among a few of my artist friends. It has what is described as a "buttery" feel when applying graphite pencil. There is significant tooth to the Fabriano which can detract from very fine details and smoother tones unless you switch to 0.5mm or even 0.3mm pencils. Fabriano is quite warm in tone and probably a more natural tone than regular Arches. The Extra White version of Fabriano used to be called Uno and is definitely brighter than the regular version. I use this paper occasionally for drawings with a bit more texture or when I am using charcoal pencil.
Strathmore 300 Series Bristol Smooth

Strathmore 300 Series Bristol Smooth
Recommended
Moderately Archival
Very similar to 400 Series except it has more tooth producing a rougher effect. I find myself disliking this paper more each time I try it. It is quite easy to draw on but the rough grain is very difficult to eliminate from the finished drawing. I find that I use 0.5mm pencils much more with this paper because of this. It is acid free with decent archival properties. I would recommend the higher grade Canson 2-Ply if you like a rougher paper just because it has a nicer feel to it.
Canson 2-Ply Bristol Smooth

Canson 2-ply Bristol Smooth
Recommended
Moderately Archival
Very similar to Strathmore 300 Series Bristol Smooth except the paper is firmer. This has a benefit and a disadvantage to it. The advantage is that it layers beautifully. You can use relatively hard grades (H or 2H and even 4H) and establish fairly dark tones by continual layering. The disadvantage, as with any rougher paper, is that it is very difficult to establish perfectly smooth dark tones. You really have to work to get the grain out of your shadows with this paper, more so than either of the recommended Strathmore versions). This is an acid-free paper with decent archival properties. It's a bit tough to find this paper as they make a student grade (see Canson Bristol Smooth above) that is far more readily available.
Canson Student Bristol Smooth

Canson Student-grade Bristol Paper
Recommended
Moderately Archival
Not to be confused with Canson's more premium version, 2-ply Bristol (see above). This paper couldn't be more different from it's cousin. Canson Bristol Smooth is very smooth and fairly soft allowing for very pleasing results with minimal effort. You can establish quite dark tones but are limited in your ability to layer with harder grades as the paper is fairly soft. It has an very, very subtle mottling to the pulp which speaks to its less-expensive manufacturing process but I've never had it affect a drawing so it's not really a disadvantage -- mostly just a feature that a paper geek would notice. I really like the effects I can get with this paper. It is an acid-free paper and is fairly easy to find online.
Rising Stonehenge Drawing Paper

Stonehenge Rising Drawing Paper
Recommended with Reservations
Very Archival
Great for colored pencil as well as charcoal. A bit toothy for very smooth textures, but it can be used to great effect for subjects with short hair or with fluffier coats. I used this for a Paint Horse and it gave a convincing texture to the coat. It has an almost fuzzy feeling that can be pleasant to work with as long on you're not trying to draw extremely smooth textures (e.g., glass, marble, etc.) I use this paper in my sketchbooks because of how easy it is to draw on. It is comparable in texture to Fabriano HP (see below), but feels a bit "fuzzier".
Strathmore 500 Series Bristol Plate

Strathmore 500 Series Bristol Plate
Not Recommended
Very Archival
Strathmore 500 Series Bristol Plate very smooth and resilient paper. Great for crisp lines and smooth textures but it can be extremely difficult to achieve truly black tones or to "graft" one drawing section into another because of the smoothness of the paper. Also, there is a tendency for blotchiness in large uniform areas if you aren't very careful in building up your layers very slowly and with minimal pressure. It is necessary to work in multiple layers to get a smooth effect but it accepts darks remarkably well considering how smooth it is, especially if you use 6B pencils. There isn't enough tooth to create multiple dark layers, so you have to be aggressive if you want to go dark and hit it with 6B right off the bat.
Update (Sept 7th, 2010): Due to changes in Strathmore's manufacturing (either their process or more likely their supplier) this paper has undergone fairly significant changes since I started using it just a few years ago. I've received thee different 'versions' of this paper and the most recent is almost like wax paper and very difficult to achieve anything over medium gray. For that reason, I've down-graded the 'Ease of Use' to 2 out of 5 stars and no longer recommend this paper to other artists.
100% cotton rag gives it the highest archival rating available. A good choice for short-haired animals or other finely detailed drawings, especially lighter pieces with little deep shadow.
"Drawing" Quality Papers:
I would avoid these for serious drawings, but I think they're great for working out compositions, drawing thumbnail samples, and daily drawing activity. I really like the Strathmore 400 Series Drawing Paper, but it has an extremely off-white tone that can make scanning difficult. It's fine for line work and for non-serious efforts.
Blu-Tack

Blu-Tack the wonder tool for pencil
Blu-Tack is a wonderful drawing tool discovered for this purpose by Mike Sibley. It's basically a wall putty that you can use for lifting graphite from your drawing paper. When it is used to dab an area of graphite it lifts each layer miraculously from the page without disturbing the underlying details. You won't have as much luck when you try to rub an area as it is so tacky it tends not to lift as well. I still use a kneaded eraser when I want to erase an area with a traditional rubbing motion but when I want to lighten a drawn area or lift graphite without causing harm to that area, nothing beats Blu-Tack. You can buy packs of it through Mike's website -- it is definitely worth a try.
Indian Paintbrush in Pastel Pencil
Continuing the trend of pastel pencil pieces for 2024, here is the newest addition to the portfolio. This is a drawing based on a photo I took last year at a local recreation area here in Missoula. It was growing along the trail and the raking sunlight filtering through the trees lit up the flower of the plant in golden highlights and set it off against the much darker green background. I was happy to find this composition and have been waiting to convert it into a drawing for quite a while, well before I decided to give pastel pencils a try.
They turned out to be an early ideal medium for the strong contrast and colors of this piece. It really shows the versatility of pastel pencils to be able to go from detailed animal furs in browns and tans to bright crimson and scarlet of an Indian Paintbrush. The strong highlights would present a challenge in any medium and these were fairly simple to maintain with the opacity of the pastel pencils.
As I continue learning more about pastel pencils, I grow increasingly amazed at their versatility.

Beginning with Pastel Pencil

White-tailed Buck
My first foray into pastel pencils was this white-tailed buck. I wanted to challenge myself with some not-so-subtle lighting and some cool and warm colors. The deer is essential half-cool and half-warm with the warm lighting coming from the righthand side of the image.
There are times in an art career when it’s time for something completely different. This year, starting in January, I finally caught the pastel pencil bug and decided to give it a try. After watching countless videos by Emily Rose Wildlife Art, Jason Morgan Wildlife Art Lessons, and Emma Colbert Art on YouTube, I had a basic idea of the materials I would need to get started.
The first choice was which brand of pastel pencils to use. Since I mostly work on realistic animals and plants, the consensus seemed to lead towards Faber Castell’s Pitt Pastels. They tend to be a bit firmer than other brands of pastel pencils and come in a pleasing range of natural as well as bold colors. There are only 60 pencils produced in the range and I picked up a full set to ensure I wasn’t purchasing more pencils immediately after beginning. I’ll definitely be experimenting with other pencils along the way but the Pitt Pastels have worked very well for my intial pieces.
The second major decision when drawing with pastels (the first in importance, however) is the paper you plan to use. Based on many, many YouTube recommendations, the general consensus for animals portraits is either Clairefontaine’s PastelMat or Hahnemühle Velour. For those looking for fine details and a more realistic result, PastelMat is the most recommended. So, armed with this information, I purchased several sheets of PastelMat in sand color from DickBlick and began my journey.

Pine Marten
My second pastel piece was of a Pine Marten hanging vertically from a pine tree. It offered a test case for detailed, fluffy fur with light details appearing over a darker plush undercoat. This looked like the perfect chance to test the light-over-dark approach possible with pastel pencils.
After getting the correct pencils and paper, I undertook two mammal drawings followed by a Cedar Waxwing to finish the trilogy. This was a good test of using a light subject over a dark background, something that is quite difficult to maintain with very messy pastel pencils. This helped clean up my technique and forced me to work clean resulting in a nicer result than I was expecting. The ultra-saturated colors of the waxwing compliments the dark green foliage in the background and helps with the appearance of the waxwing glowing in the sunlight trickling through the foliage.

Cedar Waxwing
A Cedar Waxwing drawing based on a photo I took in 2023 at a nearby pond. It landed on the trunk of a small sapling and was lighted by sunlight trickling through the foliage. I tried to capture the sense of the background fading into the shadows behind the bird while keeping the bright, saturated colors of the bird in the sunlight.
Overall, I am quite happy with the results I’m getting so far with pastel pencil. I can’t wait to see where it leads and the subjects I am finally able to tackle that I’ve been reluctant to try in the past for various reasons.
An End to a Phenomenal Year
What can I say… 2023 has shaped up to be my more successful year as an artist thus far. I reduced the number of shows I normally participated in, but each of those shows was better than the last. We started the year with the Summer MADE Fair show in June. We then had River City Roots Fest in August. Finally, we attended the Holiday MADE Fair at the Adams Center just last weekend.
In addition to some outstanding shows, I also was able to build on my presence at the Artists’ Shop here in Missoula before finally getting some notecards displayed at Rockin’ Rudy’s here in Missoula as well. It has been wonderful to feel the support of the community here in Missoula as well as gaining the confidence to try some new shows next year. We definitely have interest in the MADE Fair shows in Bozeman next Spring and Fall. I’ll update the website when I know what shows we’ll be attending.
Thank you to everyone who came out to support the local artists and makers at the shows in Missoula this year. It’s so rewarding to share in people’s excitement for the animals and wild things here in Montana. Hopefully I can put together some new prints for 2024 that can contribute to our collective love of nature here in the Rocky Mountains.
As the year comes to a close I want to thank everyone for helping make 2023 one to remember. Have a happy holidays and a happy New Year’s.
Butterflies of Montana
Illustration of the butterflies of Montana by artist Rich Adams.

Butterflies of Montana Print
As a harbinger of Spring, I thought it was appropriate to write a bit about a recent piece I created featuring the butterflies of Montana. I have recently become infatuated with 19th century scientific illustrations and wanted to produce some pieces that captured that vibe. After some self-analysis I believe that I needed an antidote to the world of lockdowns, social distancing, and general worldwide chaos. I somehow found solace in the order and regimented appearance of these types of illustrations.
So let’s talk a little about this piece.
The butterflies have to look balanced
One of the trickier parts of illustrating bilaterally symmetrical animals is that their two sides have to look very similar but really can’t be identical and still look realistic. I therefore used a hybrid approach that seemed to work okay… let me explain.

The outlines created after creating “balanced” versions on the computer.
I first sketched the basic anatomy of each species in its entirety from photographic references. All of the photos I used for this illustration were of living butterflies. This was very important to me to display them as they appear in the wild but also led to slight inconsistencies in the poses and proportions of the butterflies and their wings.
Did you Know?
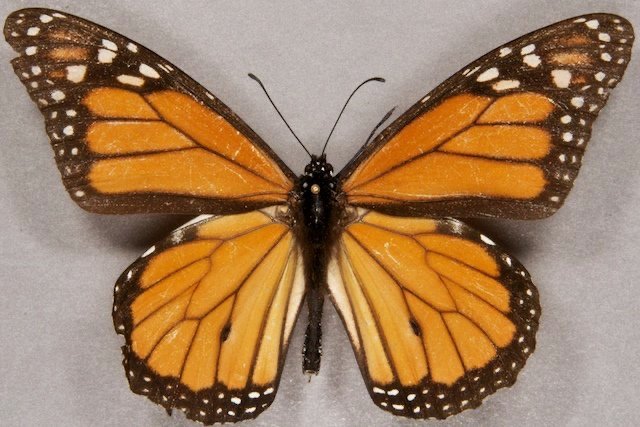
Entomologists pin butterflies to their specimen boards in a very unnatural pose where the front wings are stretched forward to reveal the details of the hind wings.
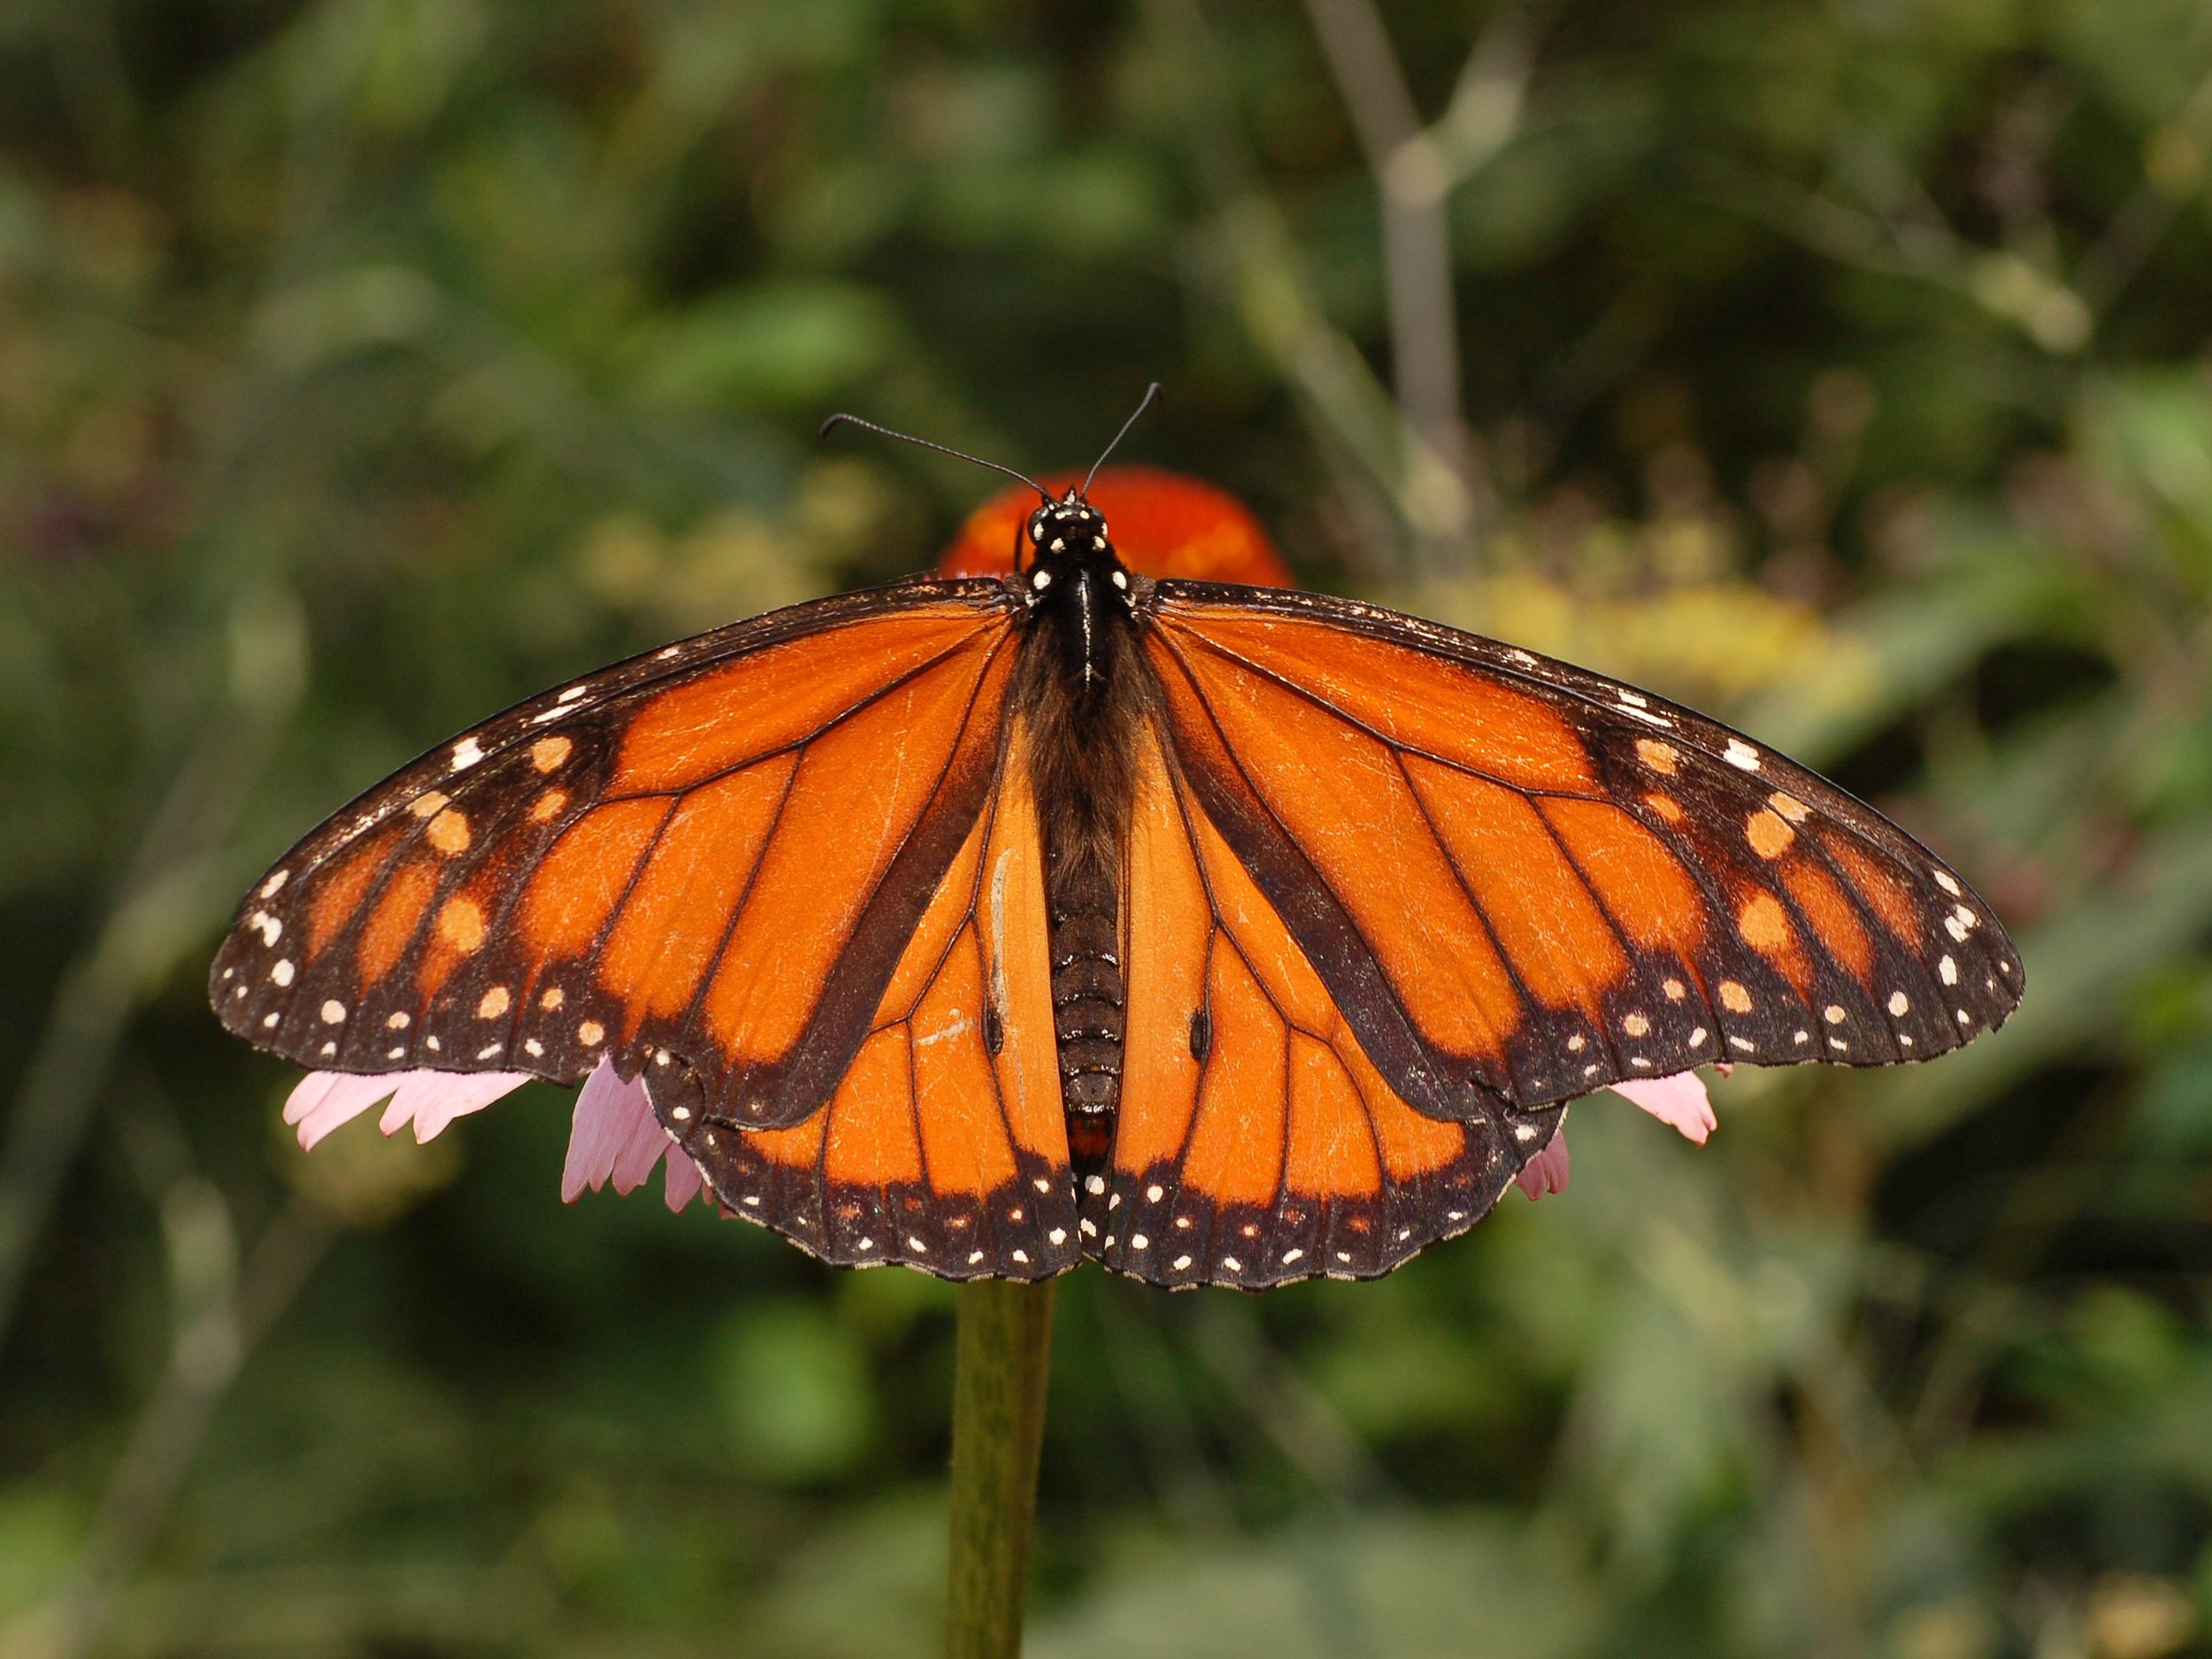
I wanted the wings to look natural and have very slight irregularities between the two sides, just like in a normal butterfly. After sketching the butterflies as they appeared in the reference images, I cut each of the outlines down the middle along the line of the abdomen and then flipped a copy over to create a mirror image This allowed me to pick the side that seemed more like what I wanted then just flattened the file and printed them as the new reference. I created outlines of these sketches and transferred them to my watercolor paper.
Next, during the painting process, my inability to exactly recreate the details on each side of the butterfly would create the natural variety you find in the actual patterns and colors in the real world samples. In the end, the butterflies had very similarly patterned wings but had natural variations that kept them looking relatively believable.
Which ones to paint?
This one was a bit easier; basically, I just picked the most common butterflies along with the ones I have a natural affinity for. I have always loved the smaller species like the Spring Azure and the Sara Orangetip so they definitely made the list. I then picked the ones that were representative of a common variety and were generally the most common example, e.g., the Clouded Sulphur, Satyr Comma, and Painted Lady. Lastly, there were the ones that were specific to Montana or at least characteristic, such as the Mormon Metalmark, Western White, Milbert’s Tortoiseshell, and the state butterfly, the Mourning Cloak. I filled in the others based on what I felt was missing. So basically it wasn't very scientific but relied on my artistic judgment.
I relied heavily on the wonderful Field Guide published by the state of Montana, that includes a list of all of the species of (not just) butterflies in Montana. If you have a few moments, I would highly recommend giving it a look: Montana Field Guide to Butterflies
Painting them the “correct” size
One cheat I employed for some of the smaller butterflies was to paint them at 200% of their actual size and then just resized them back down for the final illustration. This allowed me to incorporate more detail, have a better quality original image that I could use for other things (think stickers), as well as just being easier to paint. Sometimes the “correct” size is simply the size that suits the purpose.

All of these (except for the Mourning Cloak in the bottom left) were painted at 200%
How long did they take?
I set a limit of completing at least 3 butterflies each day to keep my time down. I started with a fineliner pen for the butterflies with dark or black details (Painted Lady, Viceroy, Monarch, Red Admiral, etc.) and then applied the color washes and details with watercolor afterwards. I really love pen illustration so this project really helped rekindle my enjoyment of using a fine (0.1 and 0.05mm nibs) pen to create tiny dots and lines and then applying beautiful transparent washes over the top. Very satisfying.

All of the originals with only one failure. Can you spot it? Oops…
Once they were all painted, I scanned them into the computer, reduced the ones I had enlarged back to their original sizes, started arranging them into a pleasing pattern on the artboard and applied the text labels. Overall, I really like the way they present a weirdly organized arrangement of flittering, fluttering, flutterbies.
Where can I get a print?
The print is available by filling out a request form below, or you can pick up a copy at the River’s Mist Gallery in Stevensville, Montana or if you happen to be in Missoula, you can find my prints at The Artists Shop right on Higgins Ave.
The prints are sized for a 16” x 20” frame size (11” x 15” image size) and are printed on 100% cotton rag archival fine art paper with pigment-based inks and are available for $50 + $8 S&H (U.S. customers only).
Rocky Mountain Eggs
Continuing on the theme begun in the Eggs of the Midwest post, I have created a new series of eggs for the Rocky Mountain region. This series is not meant to be exhaustive, only the most commonly viewed birds based on my own experiences. I also included some birds, not only because they were common, but because they had really cool looking eggs.
Some of my favorite eggs from the Rockies include the Cedar Waxwing, Western Tanager, Bullock’s Oriole, Western Meadowlark, American Avocet, and the beautiful Common Goldeneye. Also, who can ignore the absolutely gargantuan Sandhill Crane egg in comparison to some of the smaller bird eggs!
I really learned a lot about color mixing with this project, especially with the subtle bluish-greens commonly found as background colors on the eggs. This tends to be my blind-spot when it comes to reproducing colors so I feel quite a bit more savvy about cooler and warmer greens and blues as a result.

Final Egg Layout
This is the second version of eggs prints, the first being the Midwest Eggs. Both prints are available as an 11” x 15-3/4” images, perfect for a 16”x20” mat and frame size. They are created on archival 100% cotton rag fine art paper printed with pigment-based archival inks. The cost is $50.00 USD plus an additional $8.00 shipping & handling (continental U.S. only additional shipping for international addresses). You can use the form below if you are interested in purchasing one. They are also available through the River’s Mist Gallery in Stevensville, Montana if you’d like to drop by there instead.
Midwest Eggs
I recently ran across a beautiful 19th century illustration of eggs that inspired me to create my own version based on my birding experiences here in the Midwest. I have always been fascinated by natural history illustrations and was even a member of the Guild of Natural Science Illustrators several years ago. I began the design process by enumerating all of the bird species commonly seen in my backyard, including those commonly seen flying overhead. I also envisioned a series of prints available for other regions, like the Rocky Mountains where I used to call Missoula, Montana home (sigh!).
In order to begin the project, I needed a solid reference of egg sizes and colorations. Luckily I found a very handy reference in Mark Hauber’s The Book of Eggs: A Life-Size Guide to the Eggs of Six Hundred of the World's Bird Species (link to Kindle version) which served as an invaluable guide during this part of the project. The book contains over 600 species of birds’ egg from around the world and was only missing three of the 60-something individual species I selected for the project; the Bullock’s Oriole, Western Tanager, and Steller’s Jay specimens. I double-checked the dimension listed in the book against the Cornell Lab of Ornithology’s website and was pleased to find agreement on nearly all of the egg dimensions. This was the first hurdle crossed, now on the actual design process.
Design Process
The first step of the design process was to create a Master Egg. This shape could then be used as the basis for the majority of the eggs illustrated with a few of the eggs (like Killdeer eggs and some of the birds of prey) being a bit straighter-sided or oval, but these could be modified on an as-needed basis.

The Master Egg
Once I had the master completed, I then had to create a layout of all of the eggs I would need for the project. I decided on a layout organized by size beginning with the smallest egg (Ruby-throated Hummingbird) and ending with the largest egg (Turkey Vulture was the largest in the Midwest since my original choice of Sandhill Crane is not a permanent resident). This master layout had the eggs scaled to life-sized version and was the basis for the final illustrations.

The master outlines of the Small Eggs
I quickly realized that the smallest eggs were simply to small to paint effectively and would need to be scaled to 200% of their life-size in order to include the details I wanted to create. This was simply a matter of scaling the original outlines, reprinting the master images and using these as the basis for transferring to the watercolor paper using acetate.
Once the outlines were transferred to watercolor paper the fun could finally begin. I spent the next several days painting the 35 eggs chosen for the project, some more than once.
The Painting Process

Master illustrations of the small eggs painted at 200% of life size
As you can see in the illustrations, the eggs weren’t perfect, not did they need to be. This is where the true magic of the layout process began. I took the scanned images into my design program of choice (Affinity Designer) and create a mask for each of the eggs to help them look symmetrical. This was where the slight variations in the egg shapes could really be sculpted and modified without the painstaking task of creating perfect ovoids on each an every master image. This is where illustration differs from fine art where any modification of the original can sometimes be seen as a corruption.

The masking process
The Layout Process
Once all the eggs were masked, it was the simple but tedious process of fine-tuning the layout on the page including the header, labels, and identifier key at the bottom. I initially had the common and scientific names underneath all of the eggs but it appeared cluttered and really needed to be simplified. I changed to a simple label and moved all of the common names to the key at the bottom. I think this cleaned up the design and allowed for the viewer to concentrate on the eggs themselves. Overall, I really like how the final piece turned out.

Final Egg Layout
There is already a second version of this print for the Rocky Mountains Region that I will be updating soon. Both prints are available as an 11” x 15-3/4” images, perfect for a 16”x20” mat and frame size. They are created on archival 100% cotton rag fine art paper printed with pigment-based archival inks. The cost is $50.00 USD plus an additional $8.00 shipping & handling (continental U.S. only additional shipping for international addresses). You can use the form below if you are interested in purchasing one.
Jessie, Search K9 Commission
Jessie, Search K9
A couple of months ago, I decided it was finally time to have an online website other than my Wordpress page that I have tentatively updated over the past several years. After I had created the site and uploaded it, my daughter began sending me forms through my Contact Form on my Commissions page to ensure the form was working. Most were creative titles like, “Awesome drawing of some mountains and a bear”. I received what I thought was another of her forms when upon opening it I realized it was from a client I had created a drawing for several years ago. To my amazement, she was interested in a new commission; this time of her current K9 Search companion, Jessie!
Not only was she one of the best clients I’ve ever had the pleasure to work for, she was ready with top-quality photographs of her beautiful pup by the very talented photographer, Sarah Gentry. After confirming that Sarah would be okay with me using her reference photo for the drawing, we began the process of creating a basic rough for the commission that included framing of the portrait, basic dimensions, and things she wanted to include in the drawing.
The client okayed the rough and the drawing process began. I’d love to say that everything went perfectly and I found my old groove right away and Shazam! it was done. Unfortunately, time had rusted my pencil skills, resulting in two false starts and leaving me feeling very uncertain about how to proceed.
I have included the two false starts here to try to reveal a bit of the doubt and uncertainty that artists experience on a fairly regular basis. These are normally only issues for the artists themselves, but leave creative types wandering in the creative wilderness. Most of the time we find our way out, sometimes we flounder…
As for the drawings themselves, I liked the collar on the first dog, but the texture of the fur was unconvincing. I retried the drawing on another brand of watercolor paper and had even worse results than the first attempt. I was struggling.

Failures Number One and Number Two
Fortunately, I’m more stubborn than bright so I switched to my favorite paper for graphite pencil, Strathmore 400 Series Bristol Smooth (click for an Amazon link) and I started drawing number three! This time things actually went much better and I was able to complete the drawing without too much struggle. After “finishing” it, I let it sit over a weekend so I could see it with fresh eyes the following week. I made the expected tweaks and changes and finally wrapped it up by spraying it with fixative, thus making it final.
I had been in a bit of an artist coma since starting the drawing: not posting on social media, not sending e-mail communications, not looking at Instagram during the day. I received an e-mail from the client wondering about the drawing so I apologized on being AWOL and let her know it was finally finished and nearly ready to ship.
It was sealed in a bag, loaded in a mailing tube, and taken to the post office to ship it to its new home. It will be hung on the wall after the client has it matted and framed and will hang next to her previous commission of Chief.
It was an honor to work on Jessie’s commission. She is a beautiful dog and is quite photogenic. The client seemed pleased with the finished drawing which was a huge relief given the struggles with the initial drawings. She has also promised to send a photo of the final drawing hung on the wall. I will update this post when I receive the photo.
Akela
Graphite pencil drawing of a gray wolf.

The Drawing Process
It felt awkward at first, gripping the knurled metal ferules of my Staedtler clutch pencils. They have a front-heavy design and feel very substantial in your hand. The paper was new to me as well, at least for graphite drawings. Stonehenge Aqua hot pressed is a dense, bright white paper similar to my old standby Fabriano Artistico. I chose Stonehenge because you can still buy it, unlike the old version of Fabriano, and I have really come to enjoy it for watercolor.
After a few hours, it all felt very familiar: the scrap of drawing paper Blu-Tacked over the top of my drawing to protect it from the oils in my drawing hand, my clutch pencils in my left hand, and a warm kneaded eraser stuck onto my drawing board. The meditative quality of drawing replenishes me; I have missed it. I feel like 2020 has been a bit of a rebirth and it’s good to be back.
It took about four days to complete the drawing. I then enter the slowest phase where I squint and rub my graying chin and try to determine if anything else needs changing. Artists have a hard time knowing when to quit, but it takes time to truly see the drawing for what it is. Staring at a drawing for too long can leave you desensitized to the details. You need some time away to see it with fresh eyes.
After letting the drawing sit for a couple of days, I decided it needed some softening in the shadows. I used some graphite powder and a filbert brush to gently blend the details back into the shadows in her neck. This was followed by some serious cleanup work with a kneaded eraser. Finally, I applied three coats of workable fixative and it was time to call it finished.
I removed the drawing from my drawing board and scanned it into my computer and created the master file from the 6 different scans of the various parts of the original artwork. I am thankful I still remember most of Photoshop and appreciate the developments made in Stacks and Automatic Scripts in the newest version of the program!
The Subject
I took the reference photograph of this beautiful wolf back in 2013 at the Grizzly and Wolf Discovery Center (GWDC) in West Yellowstone, Montana. We had it a habit of visiting twice a year when we lived in Missoula, Montana. We were there on a beautiful May afternoon and I was shooting from inside the enclosed viewing area through one of the floor-to-ceiling windows.
This wolf was named Akela. She and her brother Kootenai were relocated to the GWDC in the Spring of 2007 from another facility in Montana. They were only 6 weeks old upon arrival. I really enjoyed seeing her on our visits and we would often try to arrange our visits for the times they were out in the enclosure. She had a penetrating gaze that I really felt spoke to the wildness of these beautiful animals.
I was sad to learn that Akela passed away in the Fall of 2020 from pancreatic cancer. Her brother is going to be 14 years old this year, which I thought was amazing for a wolf, although I learned that they have similar life expectancies to dogs when raised in captivity.
So, as with so many other stories in 2020, this one has a somewhat sad ending, but I believe that by continuing our education of young people about the critical roles that wolves play in the wild, we can hope for a brighter future for the wild animals living in the 22 million square acres of the Greater Yellowstone Ecosystem. Thank you for the inspiration, Akela!

Red-shouldered Hawk
Watercolor painting created from John James Audubon’s Plate 56.

Background
I have been a fan of John James Audubon since I first saw his paintings in books when I was a teenager. There was something so iconic about his birds, often perched on a branch with a stark white background. The birds became symbols of wilderness and nature for me.
I recently revisited some of his pieces in a wonderful oversize compendium that my wife bought me several years ago for Christmas. Even at 12″ x 15.25″, this baby elephant-scale book is tiny compared to his originals which were completed on double elephant sheets, a whopping 26″ x 38″. Nevertheless, I attempted to create my closest approximation of Audubon’s work as a tribute to his influence on me as an artist.
Here is his Red-shouldered Hawk painting. It was painted some time around 1826. I will focus on the top bird for this tribute. This is my Mt. Everest.

John James Audubon’s Plate 56 – Red-shouldered Hawk
Preparation
Because of the massive reduction in scale, there were certain things I would simply not be able to reproduce, like the pen and ink work detailing every single feather barbule. I could do a rough approximation, but not a line-for-line reproduction.
I was also unable to identify exactly what paints Audubon used for his pieces, so I adopted a Classical Palette as described by the wonderful site, Handprint.com. This palette consists of pigments readily available during the early to mid-19th century, the height of Audubon’s production for the Birds of America.
The palette I used consisted of: yellow ochre (PY43), raw sienna(PY43), gamboge (PY150/PR209), burnt sienna (PR101), light red (PR101), burnt umber (PBr7), raw umber (PBr7), vermilion (substituted with scarlet lake PR188), carmine lake (substituted with Anthraquinoid Red PR177), indigo blue (substituted with indanthrene blue PB60), Prussian blue (PB27), lamp black (PBk6 + 7) and India ink.
Paints that are common today, like Ultramarine Blue, weren’t produced until after Audubon’s time. I have tried to stay true to those paints available to him during that time or at worst, a modern substitute with the same handling characteristics.
I began with graphite pencil to create a detailed sketch of the original in my sketchbook.

Sketch of the layout ready for transfer to watercolor paper
Painting Process
With this roadmap created, it was time to transfer the image to my watercolor paper and get to work. I initially wanted to paint the darker details with watercolor but after studying his original, it was obvious he had created a lot of the textures and details with ink and then washed over this to add color. He might have added ink after some of the washes, but the lines are so crisp, I would argue that this was done before the washes since the paper would produce crisper, more refined lines prior to adding gum arabic in the form of a watercolor wash. I therefore proceeded to reproduce as much as I could in ink and then washed over these areas and added details where necessary.
After the pen and ink work was completed, I began adding color, starting with the head and working my way towards the tail. I worked down to the feet, then completed the branches, before finishing finally with the lichen grown on the branches. These required not only solid color but each was outlined with what appeared in my reproduction as a brighter green but appears more like pencil in another reproduction I have seen. I stuck with pencil as it added a more realistic appearance and was simpler to reproduce at this scale.
It took a few days but here is my final piece.
Completed painting
American Kestrel
Watercolor painting created from John James Audubon’s Plate 56.

Background
I returned to creating artwork during the early stages of the 2020 Corona virus lockdown. I had rediscovered birding and I wanted to create some sketches in color in a decent sketchbook and had a stack of watercolor paper in a flat file from back when I drew full time. After creating the sketchbook, I decided I needed to swatch out some of the colors in order to create my new palette. I had no idea the feelings it would rekindle to work with art supplies again.
After a few weeks of playing around with sketches, I began creating some larger pieces that I wasn’t wholly disappointed in. One thing led to another and I decided I needed to revisit one of my favorite birds, the American Kestrel. These fierce little hunters have long been one of my favorites and I had created a drawing in colored pencil several years ago that I’ve always wanted to improve upon.
Painting Process
I was truly learning on the fly with this piece. I had never created a serious watercolor piece before and I tried to use a delicate hand to avoid overworking the paper as much as possible. Using my favorite watercolor paints by M. Graham, I have used the pigments long enough to know how they handle. They honey they use in the paints make them very easy to rewet and create dense mixes. This helped me avoid the wishy-washy approach I knew would result from tentative noodling on the paper.
Overall, I was very pleased with this piece. There are certainly things I could have done better, but overall, for my skill level, I was able to punch well above my weight class. I truly think my love for the subject kept me locked in to completing it as well as I could. The prints I have been able to produce from this piece have also come out quite well. Overall, a very nice piece to start my serious watercolor portfolio.